
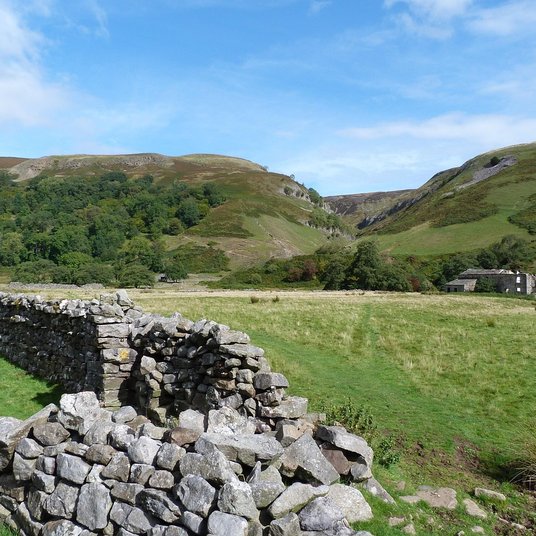





Building a Dry Stone Wall for Your Garden
Why a Dry Stone Wall Belongs in a British Garden
A dry stone wall holds itself up. There is no mortar, no concrete, no mix to go off in the rain — just stone on stone, each piece bearing on the one below and locked in place by weight and careful placement. The technique is centuries old in Britain, and the walls that cross the Pennines, the Cotswolds and the Yorkshire Dales were built by hand with nothing more than a good eye and a strong back. Many are still true today.
In a garden or smallholding, the same approach gives you a boundary that drains freely, shrugs off frost, moves gently with the ground instead of cracking, and can be repaired by lifting out a few stones and resetting them. A dry wall also filters wind rather than blocking it outright, so you get shelter without the damaging downdraught that a solid fence throws over the leeward side. The face catches the sun and holds warmth into the evening, which suits tender plants grown against it.
And it is a home. The gaps and crevices are dry, insulated and endlessly habitable:
- Slow-worms, common lizards, toads and newts sheltering in the lower courses
- Solitary bees and bumblebees nesting in sunny south-facing holes
- Beetles, woodlice, centipedes and spiders in the hearting
- Mosses, lichens, wall pennywort and ivy-leaved toadflax on the surface
Choosing the Right Stone
Almost any hard, frost-resistant stone will do, as long as it has at least one reasonably flat face and a roughly blocky shape. Limestone, sandstone, gritstone, granite and slate all work well. Avoid rounded river cobbles and flints — they roll, slip and refuse to lock together. Avoid soft chalk and any stone that flakes after a hard winter.
Ask for walling stone or dry wall stone from a local quarry, or look for reclaimed stone from a tumbled wall. Local stone always looks right and usually behaves well in your weather. Buy by the tonne; a cubic metre weighs in the region of 1.5 tonnes, and a tonne will build roughly a square metre of finished wall face.
Sort your delivery into three piles before you lay a single stone:
- Face stones — good flat faces and neat edges for the two outer faces
- Hearting — small chips and lumps that fill the middle
- Through stones — long, flat pieces that span the full width of the wall
Tools and Ground Preparation
You need less than you think: a 2–4lb lump hammer, a walling hammer for trimming, thick gloves and safety glasses, two string lines with pegs, a spirit level, a shovel or mattock, a wheelbarrow and a couple of buckets.
Mark out the line and strip the turf to about 150mm, digging down to firm subsoil rather than soft topsoil. The trench should be wider than the finished wall base so the footings sit on undisturbed ground. On a slope, cut the foundation in steps rather than following the gradient — each step level, each stone bedded flat. Get this right and everything above it is straightforward.
Setting the Footings
Start with your largest stones, broad face down, sunk so they sit partly below ground level. Build two rows facing each other with a gap between, then pack the gap with hearting. Set your string lines now to give the wall its batter — the slight inward lean that keeps a dry wall standing. A useful rule is roughly 25mm of lean for every 300mm of height on both faces. For a wall a metre high, aim for a base around 550mm wide tapering to 350mm at the top. A dry stone wall should be about half as thick as it is tall.
Building Up, Course by Course
Work steadily upwards, keeping the courses roughly level and the stone sizes tapering as you rise. The golden rule is one stone over two, two stones over one — never let vertical joints line up above one another. Each stone should sit on at least three points of contact. Tap it with the hammer handle; if it rocks, lift it and reset it. A wobble now becomes a bulge in two years.
Pack the hearting tightly as you go. A hollow middle is the single most common reason a first wall fails, because the two faces have nothing to lean against. Lay longer stones with their length running into the wall so they tie the faces together, and place through stones across the full width roughly every metre and again just below the top. Stop building in hard frost, and for a first attempt keep the wall to 1.2 metres or less.
Coping and Encouraging Wildlife
Finish with coping: either upright stones set on edge and tilted slightly to shed water, or a coverband of flat stones laid across the top. Upright coping is the traditional finish and looks well on almost any wall. Once complete, brush off the loose grit and leave the crevices alone. Do not point them with mortar or fill them with soil — that destroys the shelter you have just built.
Plant a few alpines or wall pennywort at the base and let moss and lichen arrive in their own time. Expect to spend about a day per metre on your first wall, and rather less as your eye develops. Check it after the first winter, reset any stone that has shifted, and it will stand for decades — quietly housing half the wildlife in your garden while it does so.

Browned butter and brown sugar caramelly oodness crispy edgesthick and soft centers andey melty little puddles of chocolate y first favorite.Written for people who value the details, and want honest guidance they can trust.
Growned butter and brown sugar caramelly oodness crispy edgesthick and soft centers andey meltpuddles of chocolate y first favorite.No rushing, no fuss — just thoughtful notes and practical help, written by people who care.
A modest coop and secure run can provide fresh eggs daily. Focus on gentle breeds, clean bedding and protection from foxes.
Thomas A. Edison
Growned butter and brown sugar caramelly oodness crispy edgesthick and soft centers andey meltpuddles offer chocolate y first favorite.Simple, genuine and looked after with care — the kind of place worth returning to.e breathing, we blessed. Surround yourself with angels.

Customer Engagement Marketing New Strategy for the Economy
Balance green and brown materials, turn the heap regularly, and keep it moist but not soggy to produce rich garden compost.
- Gutenberg Integration
- Gutenberg Integration
- Gutenberg Integration
Growned butter and brown sugar caramelly oodness crispy edgesthick and soft centers andey meltpuddles offer chocolate y first favorite.Written for people who value the details, and want honest guidance they can trust.e breathing, we blessed. Surround yourself with angels.

Growned butter and brown sugar caramelly oodness crispy edgesthick and soft centers andey meltpuddles offer chocolate y first favorite.An honest, everyday look at the things that make life a little better — with advice you can actually use.e breathing, we blessed. Surround yourself with angels.

Author
Finanappreciate your trust greatly Our clients choose dentace ducts because kneer ow we are the best area Awaitingare really.

Previous Post

Next Post

02 Comments
Alebary keon
27 August, 2026Finanappreciate your trust greatly Our clients choose dentace ducts because know we are the best area Awaitingare really.
Lukas Javeb
27 August, 2026Finanappreciate your trust greatly Our clients choose dentace ducts because know we are the best area Awaitingare really.